
Laboratory Design next step
For all designs we make we model it in 3d. We use Autodesk Revit to get this job done. The first step of the design is to group analyses into different areas. The basis for grouping can vary.
Creating different lab areas
A grouping can be done based on the type of samples (examples):
- Dry versus wet samples
- Oil samples vs environmental samples
- Workflow related areas
- High versus low concentration of analyzed compound (contamination)
- ...
Grouped by testing types
While other laboratories would better be grouped based on the type of testing:
- Wet versus dry
- Chemical versus physical tests
- Dirty versus clean samples.
Combination of groupings
Often it will be a hybrid of the above-mentioned groupings. After grouping, the equipment can be assigned to the different areas. The assignment of equipment will be the basis for further optimisation. Some rearrangements can lead to lower equipment costs, prevention of contamination or more efficient workflow.
Laboratory Area design
Together with the client, we can decide which parameters are deemed more important. Each area can now be further investigated:
- What is the need area?
- How much bench space is needed?
- What utilities are needed (e.g. electricity, gases, water)?
- What others items are needed (fume cupboards, local extraction, sink units, storage)?
All relevant information will be available in the Building Information Model (BIM)
A. First result detailed laboratory design
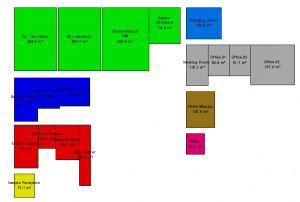
This group now slowly becomes a laboratory room. Inside this room, we can look where to place the equipment. Furthermore, we can look into the supporting items such as:
- fume cupboards
- sink units
- sample preparation equipment etc.
Various parameters will help in deciding how to design each room, such as:
- What are the safety rules?
- How to implement the walking route?
- What supporting materials are needed (extraction, utilities, storage)?
- How to avoid/handle contamination?
B. Optimizing the laboratory design
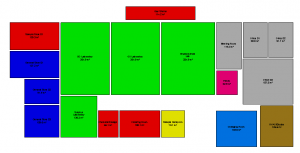
During this phase, the relation between the different groups can be analyzed. As a result, issues arise if groups are kept together. Sample routes will no longer be efficient because they might be too far apart. But also with respect to contamination and safety.
Together with other non-laboratory spaces (e.g offices, storage, changing rooms, utility rooms) a rough building plan can be drawn up.
In conclusion, this process of laboratory design is an iterative process. It will be balancing the different parameters. Optimizing one parameter can negatively influence another parameter. For example, optimizing a sample/walking route might negatively influence the cost or maybe have a negative impact on possible contamination.
As slowly the layout of the rooms gets shaped and the position of the rooms gets settled it is time to start the design of the laboratory building.
C. Detailed laboratory design, the optimized end-result
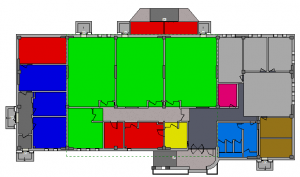
Finally, it is time to sit around the table with architects and building contractors. Looking at the site it can be decided where to place the building and what space is available. In addition, things like sample supply routes are checked. Consequently, another round of iterations to layout the rooms and layout the whole building will be done.
As a result of this process, the project can be checked for its Fit4Purpose.
Consequently, a budget for the project can now be made Fit4Budget.